

If you run a WordPress site, chances are you may encounter the dreaded “memory limit” issue, especially as your site grows and becomes more complex. Increasing your PHP memory limit is essential for ensuring your website performs optimally. In this guide, we’ll explore how to increase the memory limit in WordPress using various methods, including a popular plugin, as well as through the wp-config.php file for those who prefer manual adjustments.
Understanding WordPress Memory Limit
WordPress has a default memory limit that determines the amount of memory your PHP scripts can use. If your site exceeds this limit, you may experience slow performance, errors, or even crashes. The default memory limit is typically set to 40M (megabytes) for a single site and can vary for multisite installations.
To check your current memory limit in WordPress, navigate to Tools > Site Health > Info > Server. There, you’ll find the PHP memory limit details.
Increasing WordPress Memory Limit Using a Plugin

Using a plugin is one of the easiest ways to increase your WordPress memory limit without diving into code. Here’s how you can do this:
Step 1: Install a Memory Limit Plugin
- Go to your WordPress Dashboard.
- Navigate to Plugins > Add New.
- In the search bar, type “Increase WP Memory Limit” or “WP Memory Usage.”
- Install and activate the plugin of your choice.
Step 2: Increase Memory Limit
- After activating the plugin, navigate to Settings > WP Memory Usage (or the chosen plugin’s settings).
- Look for the section that allows you to increase the memory limit.
- Set your desired memory limit, such as 256M or 512M, based on your site’s needs.
- Save your changes.
Step 3: Verify Changes
To confirm your changes, you can use a plugin like WP Server Info to check your current memory usage. Alternatively, revisit Tools > Site Health > Info > Server to see the updated memory limit.
Increasing PHP Memory Limit via wp-config.php
If you’re comfortable editing code or if your host does not allow plugins to modify PHP settings, you can manually increase the memory limit by updating the wp-config.php file.
Step 1: Access wp-config.php
- Use an FTP client or your hosting provider’s file manager to access your website files.
- Locate the wp-config.php file in your site’s root directory.
Step 2: Define the Memory Limit
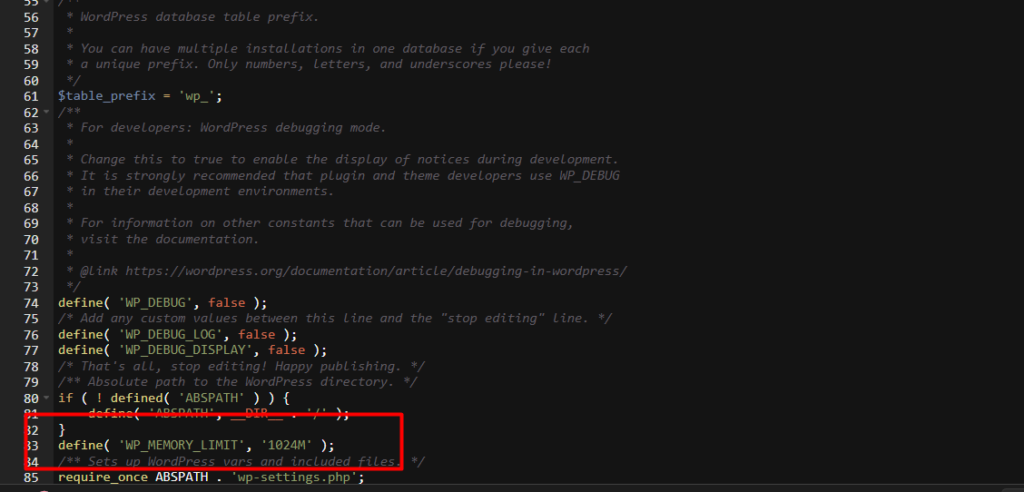
- Open the
wp-config.phpfile in a code editor. - Add the following line above the line that says
/* That's all, stop editing! Happy blogging. */:Copy
define('WP_MEMORY_LIMIT', '256M'); // Change 256M to desired limit - Save the changes and close the editor.

Step 3: Confirm the Increased Limit
To check if the memory limit has been successfully increased, follow the same verification steps as above via Tools > Site Health or using a server info plugin.
Conclusion
Increasing the PHP memory limit in WordPress is a crucial step in maintaining the performance and stability of your website. Whether you choose to do this using a plugin for a hassle-free experience or edit the wp-config.php file for greater control, understanding how to manage your WordPress memory limit is essential for any site owner.
If you run into any issues, consult your hosting provider, as they may have restrictions or additional methods for adjusting PHP settings. With proper memory settings, you can ensure a smooth and enjoyable experience for your visitors.
Feel free to reach out if you have any questions or need assistance with increasing your WordPress memory limit!